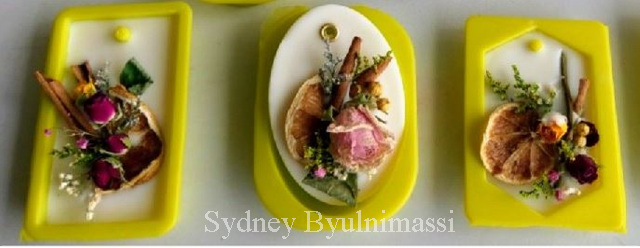
Artisan Workshop: Handcrafting Preserved Flower Wax Tablets
Artisan Workshop: Handcrafting Preserved Flower Wax Tablets
Botanical wax tablets (scented wax sachets) are luxurious decorative air fresheners designed to subtly fragrance wardrobes, dressers, linen closets, and powder rooms without needing an open flame. Embellished with dried floral blooms and finished with satin ribbons, they make memorable handmade gifts.

Required Materials & Tools
- Pillar Soy Wax or Natural Beeswax
- Silicone Wax Tablet Moulds (Single or Multi-Cavity)
- Premium Fragrance Oil or Pure Essential Oils (up to 10%–15% ratio)
- Preserved Dried Flowers, Pressed Botanicals & Decorative Elements
- Stainless Steel Beaker & Electric Hot Plate
- Digital Scale & Thermometer
- Craft Tweezers & Spatula
- Metal Eyelets, Eyelet Setter & Ribbon or Jute Twine

Step 1: Weighing & Melting the Wax
Place your stainless steel beaker on a precision digital scale and weigh out the required amount of pillar or beeswax. Melt slowly over low heat on a hot plate until completely liquefied.

Step 2: Designing Your Floral Composition
While the wax is melting, lay out your silicone mould and arrange your pressed flowers, dried botanicals, and charms on a clean workspace to visualize your composition beforehand.

Step 3: Checking Temperature & Adding Fragrance
Monitor the wax temperature using a thermometer. When the melted wax cools to 80°C, add your fragrance oil (a 10%–15% fragrance load provides long-lasting diffusion in hanging wax tablets). Stir gently and thoroughly for 2 minutes to ensure the fragrance binds evenly.

Step 4: Pouring Wax into Moulds
Carefully pour the scented wax into your tablet mould cavities. (Pro-tip: If you plan to embed heavier miniatures or thick botanicals, fill each cavity halfway first, allow it to partially set, and then pour the remaining layer).

Step 5: Arranging Botanicals on the Setting Surface
Watch the cooling wax closely. Once a delicate, opaque skin forms on the surface, delicately place your preserved florals, petals, and miniature accents using fine tweezers. (If the surface hardens too quickly, a brief pass with a craft heat gun will soften the top).

Step 6: Demoulding & Finishing with Ribbons
Allow the wax tablets to cool and harden completely at room temperature for 1–2 hours. Gently flex the silicone mould to pop them out cleanly. Secure the hanging hole with a metallic eyelet and thread with your favourite ribbon, lace, or twine.